Text Annotation Tools: Which One to Pick in 2020?
Our primer on some of the most popular text annotation tools for NLP.
Eduardo Cerna, Feb. 11, 2020


The data annotation process, as crucial as it is, is also one of the most time-consuming aspects of a project and, without a doubt, also the least-glamorous aspect of it. Therefore, choosing the right tool for your project can significantly both affect the quality of the data you end up with as well as the time it will take to complete it. With that in mind, it is safe to say that every aspect of the data annotation process should be treated carefully, including choosing the right tool for it.
We researched and tested five annotation tools and outlined the pros and cons of each one. This will hopefully shine some light on your decision-making process
Description: Developed by researchers at Intel, CVAT is an open-source annotation tool that works both for images and videos alike. It’s a browser-based application and it works only with Google’s Chrome browser. It’s relatively easy to deploy in the local network using Docker.
Pros:
Cons:
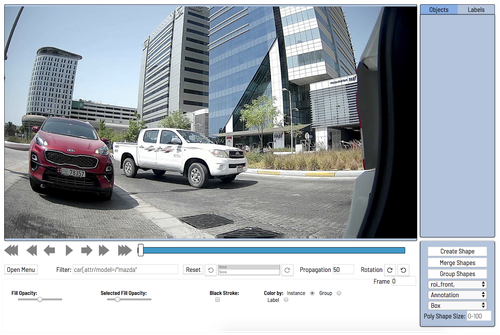
Link: CVAT
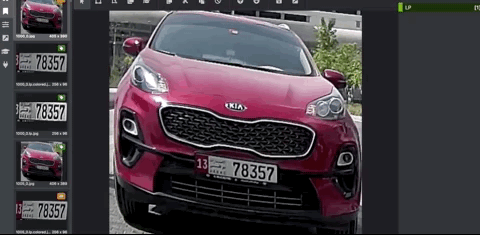
Description: Open source annotation and labeling tool for videos and images, with a no-brainer UI which feels a little outdated and getting the hang of it takes a little longer than it should. However, once you decipher how to work with it the rest goes rather smoothly. It can be run locally, offers MacOS, Windows and Linux support or it can be accessed as a web app and is compatible with most modern web browsers. I tested the MacOS version, the installation was quick and simple. The way you work with VoTT is through what they call “projects”. Each project requires a target and a source connection, meaning the locations from which the assets are pulled (source) and where the data should be stored and sent (target). For the purpose of this review I only looked at image labeling, although the process of labeling appears to be almost identical for video assets.
As mentioned earlier, discovering how to annotate data can be a little tricky with this tool, so I’ve decided to give you some quick instructions on how the labeling process works in order to save you some time: After having selected the data to annotate, as well as the source and target connections, you can proceed to annotate then images by creating a tag on the right-side panel. VoTT then offers shortcuts, you can press the P key for drawing a polygon or the R key for a rectangle. When choosing to draw a polygon, you pinpoint the contour of your target object and when you’re finished, you double-click on the last location. Here’s an illustration for labeling a license plate on a car:
Pros:
Cons:
Link: VoTT
Description: Labelbox has a slick user interface and a ton of functionalities. In their own words, they are a “data-labeling and training-data management platform”. On top of their computer vision functionalities, they also offer text classification functionality. Their software is offered in three ways:

Pros:
Cons:
Link: Labelbox
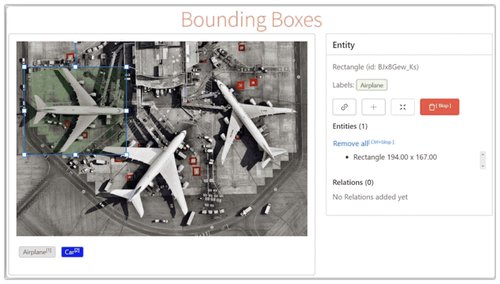
Description: An extremely simple image-only annotation tool written in Python and relying on the Qt library for its UI. Needs to be installed locally and the installation process is more cumbersome than it should be, at least on MacOS. Labellmg allows for bounding boxes only.
Pros:
Cons:
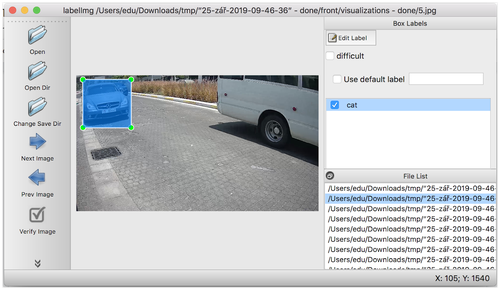
Link: LabelImg
Description: Perhaps the best of the bunch, Dataturks offers a free collaborative annotation tool that you can sign up for free via their servers or alternatively, they offer an on-premise version which can be self-hosted. Like most other annotation tools, Dataturks also offers the ability to tag images and videos. In addition, you can also work with entity tagging for full-length documents through its document annotation functionality.
Pros:
Cons:
Link: Dataturks
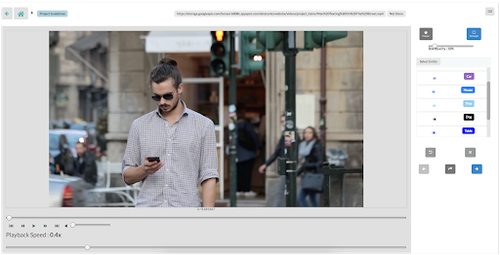
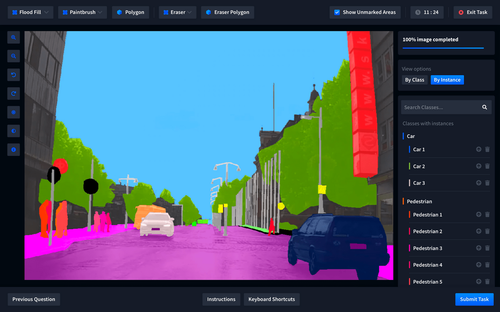
The least well-known and most recent contender on our list, Label Studio is an open source, multi-type data (audio, text, images, and HTML) labeling and annotation tool released in late 2019 and developed by Heartex, a San Francisco startup focused on preparing, analyzing and training AI data. Label Studio is a simple yet powerful tool that offers superb flexibility and can be customized to individual needs. If you ever encounter yourself working with a custom dataset and thinking that you’ll probably also need to develop your own annotation tool, Label Studio will save you the effort. The tool can be installed and run on your local machine or it can be embedded into your applications. For exporting, the data is stored in a .json file in raw completion format. However, converting the files to other formats is relatively simple through their export page.
Be wary, nevertheless, that the simplicity that Label Studio offers doesn’t come without its caveats. During our testing, one of the shortcomings we found was that there’s no simple out-of-the-box way we could find for going back to an asset you already labeled. This will most likely have to be custom-coded into the application itself.
Pros:
Cons:
Link: https://labelstud.io/
The tools outlined above should be more than enough for most data annotation needs. However, if your team is in need of some large-scale, enterprise solution, you should consider Playment. Although I didn’t get a chance to test it, as they only offer guided demos with their sales staff, the functionalities outlined on their website are rather interesting and they add a layer of complexity to their offering that no other data annotation tool I have reviewed has, as well as adding some AI-powered capabilities which they claim make the labelling process a lot smoother and faster, with a very high-quality output.
Link: Playment
Although we have reviewed but a handful of annotation tools of the many that are available out there, we believe that if you decide to choose from any one of them, it should be enough for most data annotation needs. However, this article wouldn’t be complete without giving a recommendation on what we think the winner is and, before we do that, it’s necessary to disclaim that we are not in any way associated with any of the tools we have reviewed here and the information outlined should serve only as a starting point for making a decision. As we’ve already established, no two projects are the same and therefore what works for one project doesn’t necessarily have to work for another. Make sure you’re familiar with the magnitude of the task at hand, as well as the desired export formats before you make a decision.
With that being said, after having tried out the different tools we have outlined in this article, I believe that the tool which will fit almost anyone’s needs is Dataturks. Dataturks offer a lot flexibility in terms of the different ways you can annotate data, support for both video and images and finally, export formats. It’s also free and it comes with a clean, easy to use interface. However, if you and your team can afford it, Labelbox is an excellent option. The only reason why we chose to recommend Dataturks over Labelbox is that Dataturks is free. Labelbox offer a rather limited free version which gives you the ability to annotate up to 2,500 assets per year, which will be enough only for small-scale experiments.
Our primer on some of the most popular text annotation tools for NLP.
Plain English intro to your first AI project: why the idea of accuracy is dangerous and why 99% is probably not the number you need.
How an innocent-looking cognitive bias can ruin your machine learning project before it even starts. This was demonstrated on a mystery shopping experiment we conducted on Upwork.